The checkout process is one of the most important components of any eCommerce transaction. Why? Because we are now on the last step of converting your website visitor into a customer and we are not in the business of letting a sale walk out of the hypothetical internet door. Our visitors are primed for this transition, all we need to do is carry them over the threshold.
The first way we do this is by making sure that our checkout pages are as clear and functional as possible without causing friction for our visitors. We haven’t spent time designing fantastic landing and store pages just to annoy or confuse the customer. Do yourself a favor and check out our previous post on How to Create a Custom Divi WooCommerce Category Page if you’d like a tutorial on how to do just that.
The second thing, and equally important, is to utilize this opportunity while our visitor is primed by bringing value to both the visitor and our store. Order Bumps are a proven method to make this happen and you’re about to find out exactly how to implement them in your store.
So what is an Order Bump anyway?
On the meta, order bumps are simply a last-minute offer or discount to increase the Average Order Value right before the visitor submits their payment information on your online store. We’ve all seen them. You are casually checking out on your favorite online retailer when you notice some other shiny things while inputting your card info and whoops, you just added a case to go with your new Oculus.

So now that we know what an Order Bump is, let’s take a look at why they are important.
Benefits of using Order Bumps
Increases the Average Order Value
This plays into the whole psychology of where your visitor is at this moment. They have already made the decision to make a purchase at your online store, so they are primed for the idea of potentially adding more products to their cart. The probability of increasing the order value goes up when you offer items complementary to those already in their cart at a discount on the checkout page. Say for example they are checking out with sunglasses in their cart, a sunglass case with a 10% discount would be an excellent Order Bump.
Improves Customer Experience
The simplicity of the one-click add-to-cart of an Order Bump makes it easy for a customer to pull the trigger on that item. This is especially true for Order Bumps that can aid in customer peace of mind like extended warranties. And as if that was not enough, things like free shipping will give you customers the warm fuzzy feelings potentially referring more traffic to your online store.
Exposure to More Products
More exposure, especially when relevant, can increase engagement and inform customers of product categories they might not have known existed. And for me, I’m often pointed to products I didn’t even know I needed prior to seeing them in an Order Bump.
Some great examples of Order Bumps

Apple
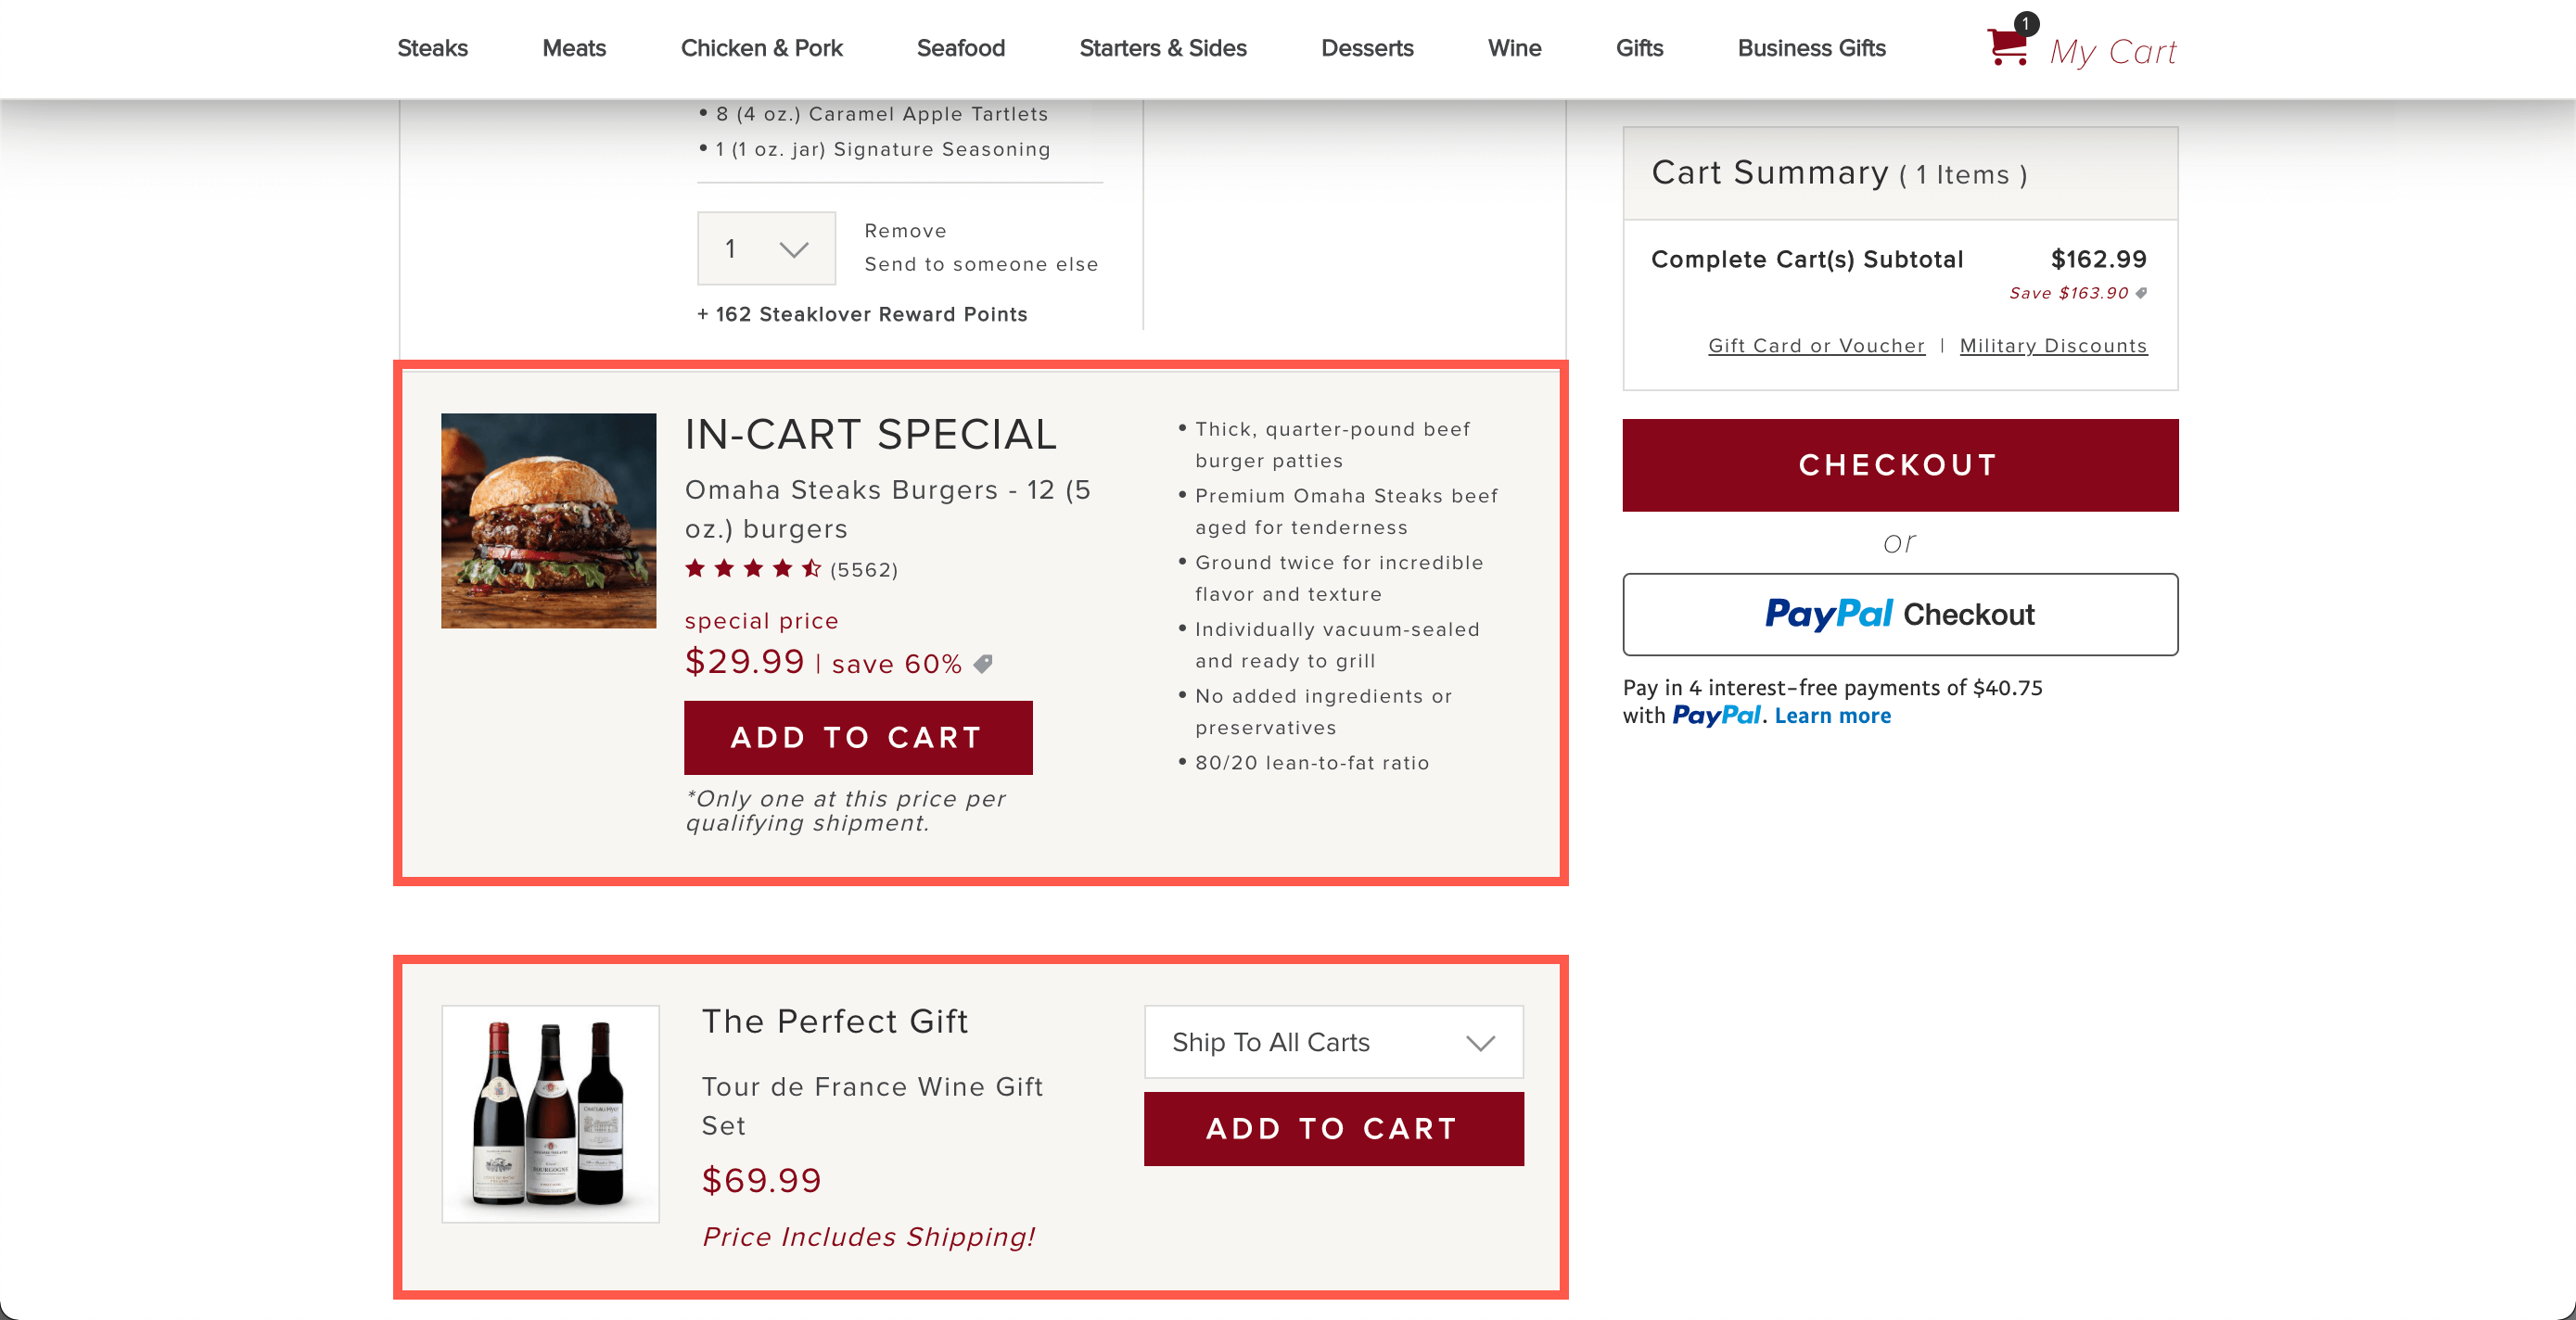
Omaha Steaks
These guys do a fantastic job of their Order Bump by offering relevant discounts on additional cart items by making a big deal out of the fact that this is an in-cart special. Things like highlighting the extent of how deep the discount is and how, well, special the special is, goes a long way.
Let’s get to it!
Different ways you can add Order Bumps to WooCommerce and Divi

Order Bump for WooCommerce

WooCommerce Upsell Order Bump Offer Pro

BodyCommerce: Divi WooCommerce Customizer
If you are already using a plugin to Create and Manage your Order Bumps in Divi and WooCommerce, fantastic! You are already on your way to boost your sales and deliver the best possible experience for your customers.
Next, we are going to show you just how easy it is to add Order Bumps using BodyCommerce.
PRO TIP: Order Bumps are just one of many enhancements you get when you buy a license for BodyCommerce, check out our feature page to see the other ways you win when you use BodyCommerce.
How to add an Order Bump to WooCommerce and Divi using BodyCommerce
COMPLEXITY
Easy
TIME
10 Minutes
ASSUMPTIONS
- Basic knowledge on Divi, WooCommerce, and BodyCommerce.
- Divi, WooCommerce, and BodyCommerce are already installed and configured.
- You have some products with assigned categories in WooCommerce.
VERSIONS
Divi 4.9.2
WooCommerce 5.1
BodyCommerce 5.3.1
Let’s get started!
Building the Layout for our WooCommerce Order Bump
To get the ball rolling, head over to your Divi Library and add a new layout. We called ours “Order Bump Layout” but you can really call this anything you want. When prompted select “Build From Scratch” and add a 2 Column Row.
Speedrun
Divi > Divi Library > Add New Layout > Build from Scratch > Add 2 Column Row

Great, now let’s start adding some modules. We will start with adding a thumbnail for our Order Bump layout, so click on the Add Module “+” in the first column and select the “.LL Thumbnail – Loop Layout” module.
.LL Thumbnail – Loop Layout Module
Speedrun
.LL Thumbnail – Loop Layout Module
Content Tab
Link Image to Single Page: NO
Image Style: Image Only (no overlay)
Content Tab
All we have to do here is to remove the link to the product page by setting “Link Image to Single Page” to “NO” and also removing the image overlay by changing the “Image Style” to “Image Only (no overlay)”.
We do this because we don’t want to tempt the customer into clicking the image and being taken away from the checkout page. We also don’t want to distract them with overlays.

All done, next up is adding our product title to the second column. To do this we will add a “.PL Title – Product Page / Loop Layout” module at the top of the second column by hitting the grey “+”.
.PL Title – Product Page / Loop Layout Module
Speedrun
.PL Title – Product Page / Loop Layout Module
Content Tab
Title HTML Tag: h3
Content Tab
We just want to increase the title size a bit, so set the “Title HTML Tag” to “H3”.

Now here we get into 2 modules that are specific to our Order Bump of which one is always needed for order bumps to work. First, we will add the optional “.CF Order Bump Price – Checkout Funnel” module which as you guessed, displays the product price and will reflect any special discount you added for the Order Bump.
To add it, hit the grey “+” below the .PL Title – Product Page / Loop Layout module we just added and select the “.CF Order Bump Price – Checkout Funnel” module.
.CF Order Bump Price – Checkout Funnel Module
Speedrun
.CF Order Bump Price – Checkout Funnel Module
Design Tab
Price Font Weight: Bold
Price Text Color: Red
Design Tab
To make our fantastic discount pop out a little more, we are just going to change the “Price Font Weight” to “Bold” and give the “Price Text Color” a nice “Red”.

Time to add the .CF Order Bump Add – Checkout Funnel module will allow our visitors to add the product to their cart with one click without needing to leave the Checkout Page.
Hit that grey “+” again and select the “.CF Order Bump Add – Checkout Funnel” module.
.CF Order Bump Add – Checkout Funnel
Speedrun
.CF Order Bump Add – Checkout Funnel
Content Tab
Checkbox Label: “Grab this exclusive offer right now!”
Design Tab
Field Background Color: #0df1a5
Field Text Color: #5430ce
Content Tab
We want a catchy label here that will create some urgency for the visitor. Let’s change the “Checkout Label” property to “Grab this exclusive offer right now!”.
Design Tab
To make the, for lack of a better word, add-to-cart checkbox, stand out a bit we can conveniently style it from the design tab. We will change the background of our checkbox by adding the color “#0df1a5” to the “Field Background Color” property. All that is left to do here now is add “#5430ce” as our “Field Text Color” and we are almost done with our Order Bump Layout!


To round things out we are going to add a border around the whole layout so it does not get lost on our Checkout Page, then also add a nice title to draw the vistors eye to the Order Bump offer.
Let’s open the section setting and add the border first.
Section Settings
Speedrun
Section Settings
Design Tab
Border
Border Width: 5px
Border Color: #0df1a5
Border Style: Dotted
Design Tab
Under the “BORDER” section add a “Border Width” of “5px”, set the “Border Color” to “#0DF1A5”, and set the “Border Style” to “Dotted“. Super easy!

Almost there folks!
The last thing we need to do is add a Single Column Row then add a Text Module above the other row we have in our WooCommerce Order Bump layout. Click that green “+”, select “Single Column Row”, then add a “Text Module”.
Text Module
Speedrun
Text Module
Content Tab
Text Body (H3): “LIMITED SPECIAL OFFER!”
Design Tab
Heading 3 Font Weight: Bold
Heading 3 Text Alignment: Centered
Heading 3 Text Color: Red
Content Tab
To grab our visitors attention we will change the “Text Body” to “LIMITED SPECIAL OFFER!” and set it to “Heading 3”. Seems urgent enough.
Design Tab
Under “Heading Text” we need to select “H3” so that we only target the relevant heading. We need to change the “Heading 3 Font Weight” to “Bold”, “Heading 3 Text Alignment” to “Centered”, and give the “Heading 3 Text Color” a “Red” color.
Now just save and drag this new green row to the top of our section and we can save the Divi WooCommerce Order Bump layout!

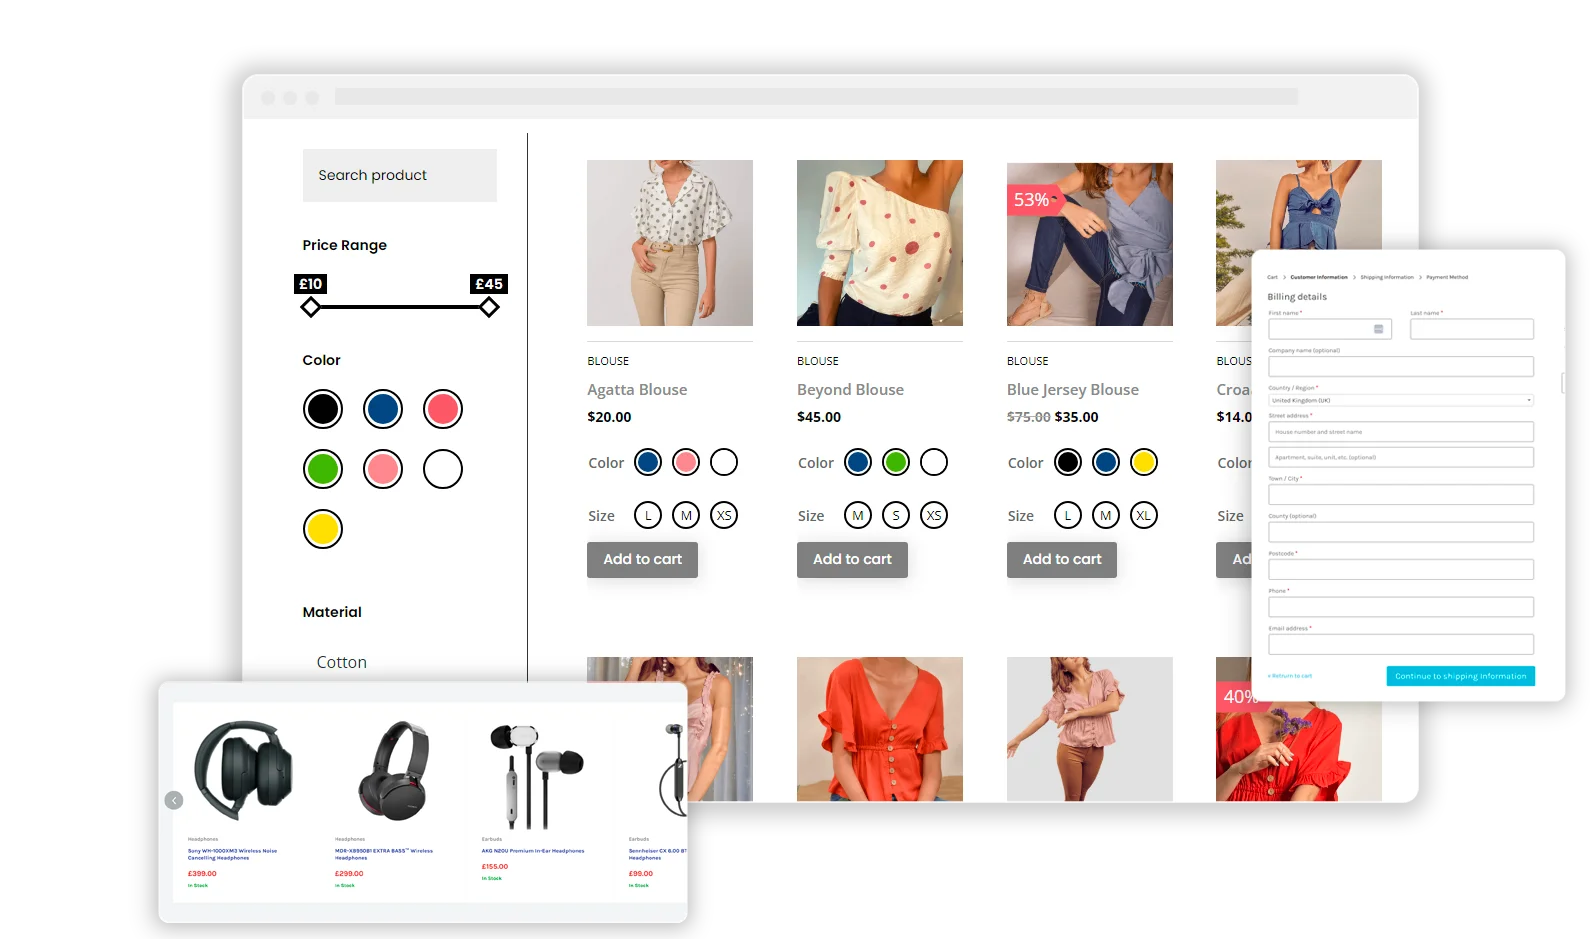
Before we continue, let’s just quickly take a look at our checkout page to see what it looks like right now.

Wait, where is our Divi WooCommerce Order Bump we just hand-crafted? Don’t stress, we just need to head into the BodyCommerce settings to tell it to use our new layout.
Configuring Divi BodyCommerce to Display our WooCommerce Order Bump
Speedrun
BodyCommerce Settings
Order Bump Tab
Enable Order Bump: YES
Product Type to Show: Specific Product
Specific Product: Sunglasses
Select Order Bump Template: [Name of layout you created in previous step]
Order Bump Position: Before Payment
Now for the easiest part, telling BodyCommerce to magically display our fancy layout right on the checkout page in one for the preset locations.
Go ahead and browse to your BodyCommerce settings and click on the “Order Bump” tab.
Once here we want to flip the Order Bump setting on, so set “Enable Order Bump” to “YES”.
To select how products get pulled in to be displayed in the Order Bump, we need to select the “Product Type to Show”. For the purposes of our tutorial, we will set this to “Specific Product”
NOTE: BodyCommerce Order Bumps let you pull products in in different valuable ways not covered in this tutorial. Please check out our documentation for more information on all the settings available regarding Order Bumps.
Right below you can select any “Specific Product” you like, we selected “Sunglasses”.
Next, we need to tell BodyCommerce which layout to add to our Checkout Page. This is where we select that hand-crafted layout of ours. Just hit the drop-down next to “Select Order Bump Template” and select the layout you created previously.
Last step, can you believe it? We need to decide where we would like our WooCommerce Order Bump to be displayed. You can see all the options in the “Order Bump Position” drop-down, we selected the “Before Payment” option, but feel free to experiment and see what works best for your site.

And that ladies and gentleman, is how easy it is to add a custom Divi WooCommerce order bump to your eCommerce store. I told you it was easy, didn’t I? Congrats champ!

Order Bumps are only one of the hundreds of customizations you can do in Divi WooCommerce stores with the power of BodyCommerce.


0 Comments