You know the feeling, it’s a Saturday morning and you’re just about to start your day. You head over to make that quick change on your website but all you see is an ugly white screen with no additional information. What do I do now? This awful pain known as the WordPress White Screen of Death is one of the most common errors when using this platform which can be quite frustrating for those who are unfamiliar with coding! The error usually means that your WordPress install has had a critical failure and you are now locked out of both the front and backend of your site.
Don’t worry, before you start punching your monitor, today we will show you a few ways to fix the dreaded WordPress White Screen of Death. Some of the steps we will cover might look very similar to a tutorial we posted a few weeks ago where we discuss 7 Things to Try When the Divi Builder is Not Loading, so definitely check that post out if that is what brought you here today.
Let’s jump right into it!
Video Tutorial
Table of Contents
Difficulty
Easy
Time
15 Minutes
What Causes the White Screen of Death?
Because of the vague nature of this error, it can sometimes be hard to immediately know what caused the error. Often it might be that you just updated a WordPress plugin or theme that you have installed on your site that triggers the WordPress White Screen of Death.
Other instances could be that you were modifying code in one of your WordPress files that contains a syntax error, thus causing this situation. If you’d like a little more detail on what could be going on, you could enable WordPress debugging in the wp-config.php file. Just take care when editing this file and definitely follow this guide on Enabling Debugging in WordPress by its developers.
Troubleshoot Your Installed Plugins
Plugins are fantastic because they make our life easier, right? Well, most of the time. Sometimes plugins cause conflicts or might have some errors in the code, which triggers the WordPress White Screen of Death. To check if one of your installed plugins is at fault, we will need to disable all of them to quickly see if this is the case.
Wait a minute, but you can’t access the backend of your site, what now?
Pretty simple, we will need to either use our hosting provider’s file browser, or FTP into our site, then rename our plugins folder to something else. This will disable all the plugins on your site so that you can quickly assess whether one of them is causing the WordPress White Screen of Death.
Whichever method you use, just append something like “-old” or “-temp” to the end of the plugins folder inside wp-content.
Clear Your Browser and WordPress Site Cache
Caching is a great feature of modern browsers, web hosts, and websites, but those cached files can sometimes lead to unexpected results. One of these could be that a plugin or theme update triggers the naughty WordPress White Screen of Death.
To best troubleshoot caching issues, here are the steps to see if this is your issue. Check to see if your website is loading after you have tried each of these steps.
Purge Browser Cache
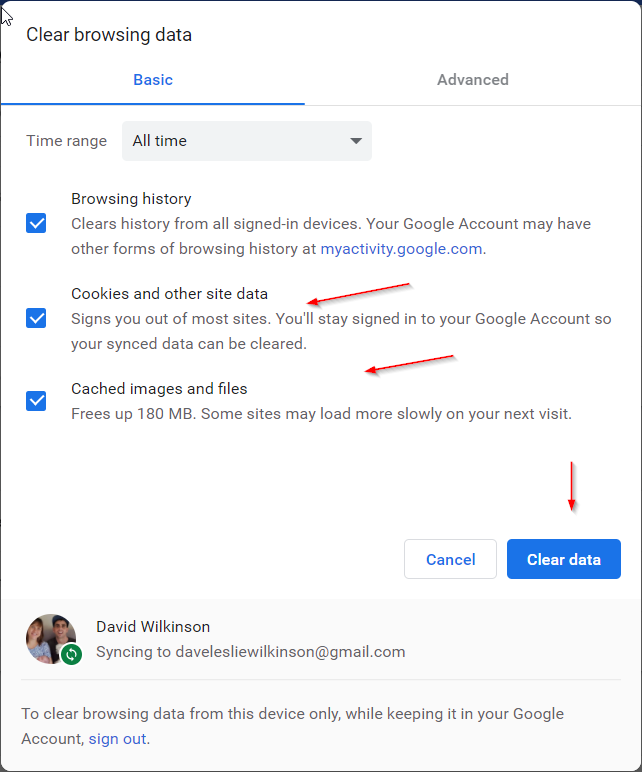
Just like caching plugins, browsers provide additional caching solutions to store website files locally on your computer. This helps your browsing speed, but can also sometimes lead to issues when these files get a bit out of date.
Now, just like fluffy tabby kittens, browsers come in all flavors, and as such, have different steps to clear the browser cache.
No stress, just check out This Site > Select your Browser > Follow the Instructions.
Purge Server Cache
Most hosting providers worth their salt will have the option to utilize a server caching solution. Still, as with the aforementioned steps, this can lead to the WordPress White Screen of Death because of outdated cache files.
Depending on your hosting provider and which solution they offer, the steps will differ, so if you are uncertain, contact their support team, and they should be able to sort you out in no time.
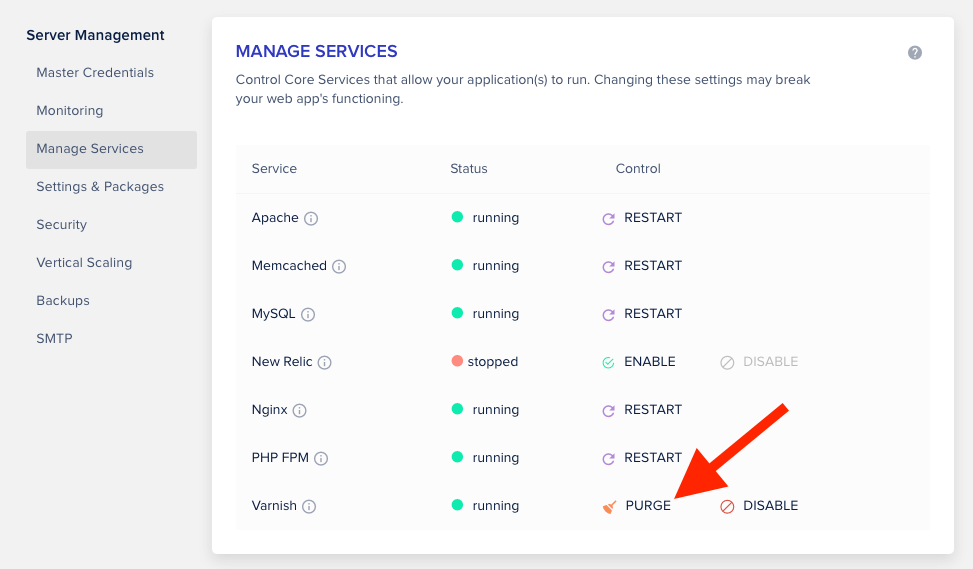
Cloudways utilizes Varnish, so all we need to do is log into our Cloudways Account > Select our Server > Server Management > Manage Services > Varnish > Purge.
Disable Caching Plugins
As a last resort, you can try disabling your caching plugins temporarily. Because we might NOT have access to the backend of our site, we will need to FTP into our site and rename the plugin folder of the caching plugin we are using.
Access your site using your FTP client of choice.
Browse to /wp-content/plugins.
Right click the folder name of your Caching Plugin.
Select Rename, and just add something like “-temp” to the end of it’s name.
This will disable the plugin and allow you to see if this was the culprit. Be sure to revert this change after you are done.
Increase Your PHP Memory Limit
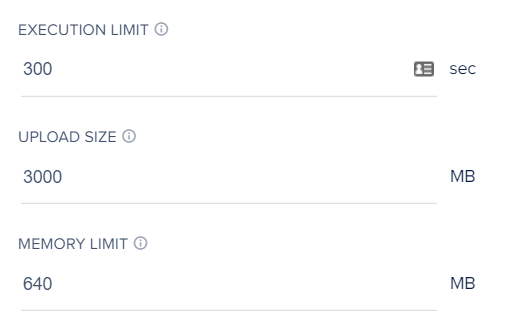
Sometimes when your WordPress install runs out of memory, it might trigger the WordPress White Screen of Death. The best practice in this scenario would be to check the amount of server memory allocated to your install and then increasing it if need be. We recommend you make sure that your Memory Limit is at least 128MB.
This setting can easily be changed by editing either the Hosting Control Panel or your WP-CONFIG.PHP (for increasing the Memory Limit) files. If you have a good Hosting Provider like Cloudways, this process is very simple.
For full instructions on how to increase your PHP memory limit.
For full instructions on how to increase your PHP memory limit, check out our tutorial on How to Fix “Fatal Error: Allowed Memory Size Exhausted” on your WordPress site.
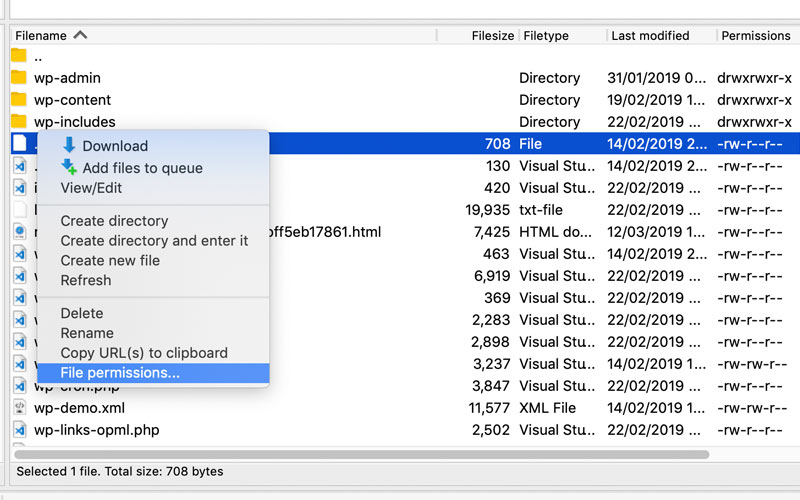
Double-Check File Permissions
In Short, WordPress file permissions are authority roles assigned to users to manage a website’s files and folders to make sure that hackers or other malicious parties don’t make changes to your WordPress files. For this reason, it is important to set correct permissions to the files and folders because WordPress permissions play an important role in the overall security of your WordPress website.
Sometimes when we update plugins or modify files, we can accidentally change the required permissions for WordPress files. There are a bunch of different ways to fix your permissions in WordPress depending on your technical level. For greener folks, we recommend just contacting your hosting provider to fix the permissions, but for those of you comfortable FTPing into your WordPress install, you can just follow this guide by the WordPress team on Changing WordPress File Permissions.
Restore a Backup
Worst comes to worst, most hosting providers offer daily automatic backups which can be a real lifesaver if your WordPress White Screen of Death persists. This might not be the ideal solution you were looking for, but it is one that is pretty much guaranteed to sort this issue out.
The process to do this will vary based on your host, but you should usually be fine with just contacting their support team and asking them to restore a recent backup easily:
Log into your Cloudways Account.
Select the WordPress install with the WordPress White Screen of Death.
Click on “Backup & Restore“.
Select the Backup you would like to Restore.
Click on “RESTORE APPLICATION NOW“.
The hard part is done, consensual chest bumps for everybody!!
Conclusion
If you’ve been struggling with the WordPress White Screen of Death, we hope that this guide has helped you out. It may feel like a daunting task to fix your site after it crashes and displays an ominous white screen, but there are lots of troubleshooting steps you can take to get things back up and running again. We wish you luck in restoring your website!
If you have any comments or other ways of fixing the WordPress White Screen of Death, definitely let us know in the comments below.

















0 Comments